From Parts to Powerhouse: Witness the Incredible Assembly of the Hitachi EX8000 Mining Shovel

Wajax Expert: Joe Rydel, VP of Mining Operations – National
Joe Rydel is the VP of Mining Operations at Wajax, bringing over 20 years of experience in heavy machinery and mining industries.

Wajax Expert: Yves Girard, RVP – Oil Sands & Mining
Yves Girard is the Regional VP of Fort McMurray Oil Sands & Mining at Wajax, bringing over 30 years of experience in heavy machinery and mining industries.
Manufactured in Japan and delivering an impressive 2x 1944 HP, the Hitachi EX8000 is a true giant of the excavating world. With a max dig reach of 73 ft 2 inches, this monster of a machine is powered by two Tier 4 Final engines that deliver exceptional fuel performance.
Designed to reliably support some of the most challenging mining operations, the EX8000 is Hitachi Construction Machinery’s largest machine, requiring 26-28 trucks to transport it via road for initial assembly. In this article, we take a look at how it’s assembled and some of the considerations that need to be made from start to finish.
But before we do that, to really appreciate all the details, take a glimpse into the real-life assembly process captured in this amazing timelapse video we put together.
Fascinating, eh? Now let’s take a deeper dive into what really goes into making this happen. Here’s what we’ll be covering:
- Why Proper Assembly is Crucial
- What Makes the Hitachi EX8000 Mining Excavator So Powerful
- Ideal Applications for the Hitachi EX8000
- Key Components of the Hitachi EX8000
- Hitachi EX8000 Assembly Best Practices
- How You Can Enjoy the Benefits of the Hitachi EX8000
Why Is Proper Assembly Crucial?
When dealing with any type of heavy equipment, proper assembly is crucial, however, this concept is taken to the next level with the Hitachi EX8000 Mining Excavator. Once all of the excavator’s many large pieces have arrived on site, it’s typically a 45-90 day project (depending on local options) before a fully-assembled and operational excavator is brought to life.
However, this doesn’t mark the end of the process, as the commissioning and testing phases then need to be carried out. This process involves support teams from Wajax, Hitachi Construction Machinery themselves and other experts to ensure that promised levels of productivity are achieved.
Without such expert guidance, what is essentially a $20 million machine may not meet its full potential, resulting in a loss in ROI for the mine operator. That’s just one of the reasons why Wajax provides such comprehensive after-sales support.
For a vivid understanding of its size, look at the bottom-right corner of the illustration below to see how a person with their arm stretched above their head compares to the height of the side frames.
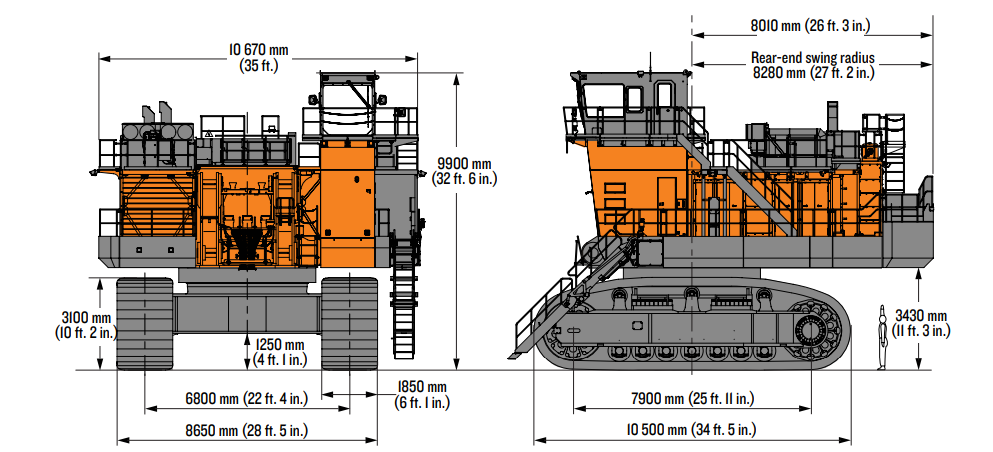
Click here to familiarize yourself with the various parts of this beast of a machine.
What Makes the Hitachi EX8000 Mining Excavator So Powerful?
Available with either 2x 1944 HP Cummins 16-cylinder 60 liter or 2x MTU 12-cylinder 2,012 HP engines, as well as an electric drive option of 7.2 KVA, the EX8000 offers advanced hydraulic performance. Heralded by the manufacturer as Big on Productivity & Reliability, this rig also offers state-of-the-art safety features to ensure all crew members stay safe.
Other impressive specifications include:
Backhoe
- 2 x 1450 kWH Power Output
- 849,000kg Operating Weight
- 27.7ft Max Dig Depth
- 73.2ft Max Dig Reach
Front Shovel
- 2 x 1450 kWH Power Output
- 830,000 kg Operating Weight
- 14.5ft Max Dig Depth
- 61.7ft Max Dig Reach
In addition to simple controls that include electronic joysticks and a multifunctional display, the EX8000 is also equipped with cutting-edge diagnostic tools and onboard sensors that provide exceptional machine performance insights and data.
What are the Ideal Applications for the Hitachi EX8000?
The EX8000 has been designed to excel in all types of mining applications from overburden and ore removal to site reclamation. The EX8000 has been particularly successful in the oilsands operations of Northern Alberta which is home to the largest fleet of EX8000’s globally. Buyers can expect top-level performance and reliability thanks to Hitachi’s proven componentry, durable frame and front attachment structures, and finely tuned hydraulic system.
A wide range of benefits can be enjoyed, such as:
- A cab design that minimizes operator fatigue & improves operational performance
- Advanced technology that drives down fuel consumption
- Superior productivity across a range of different digging profiles
- Enhanced operator, bystander, and machine protection through excellent safety features
What are the Key Components of the Hitachi EX8000?
As you saw in the video above highlighting one of these giant machines being put together, a great deal of preparation must occur prior to assembly. Primarily, the customer needs to provide a large, flat, compacted area of ground that can support the EX8000’s weight.
Then, while delivering each part, they need to be arranged in a way that places each key component in the right place for easy assembly. Those key components include:
- Side frames, car body, and main frame
- Power modules (which contain the engines)
- Hydraulic system
- Operator cab
- Undercarriage
- The boom, arm & bucket
- Electrical systems and controls
- Counterweight
The proper tools and support equipment and a project-specific safety plan are also critical elements to a safe and efficient assembly. Once everything is where it needs to be, the 45-90 day-long assembly process can start.
What are Hitachi EX8000 Assembly Best Practices?
As we mentioned a short while ago, proper assembly is crucial if you aim to get the most out of the Hitachi EX8000. So, we’re now going to cover some of the pitfalls to avoid and a few tips from Wajax experts.
Step 1 – Observing Safety Precautions
Naturally, the first point of consideration is to ensure that all necessary safety precautions are adhered to. As such, you should take the following steps:
- Ensure all technicians & operators are both trained & qualified to operate the required tooling and machinery
- Check that all personnel in the area are wearing the appropriate personal protective equipment (PPE), including steel-toed boots, gloves, goggles & hard hats
- Review assembly instructions & machine specs prior to commencing the assembly process to ensure familiarity with the tasks at hand
- Adhere to all safety regulations & guidelines specific to your site/location
- Ensure that project specific safety plans, job hazard assessments, pre-work hazard assessments, and other required safety documentation is prepared and in place
Step 2 – Assembly Area Preparation
The area of assembly must meet a few key criteria to ensure no unnecessary delays are experienced during the process. This means:
- Locating a level, stable surface that provides ample space for assembly
- Getting rid of any debris or obstructions from the area
- Controlled entry/exit to build pad
- Setup of office trailer, wash cart, and tooling containers
- Installation of build pad signage
- Laying out all structures and components to allow for easy access during assembly.
Step 3- Assembly of Lower Structure
Now we come to the main component assembly, where we’ll start to see the machine take shape. In the next part of the process, you’re going to be:
- Assembling the lower structure by attaching the side frames to the car body
- Assembling the track pad segments and wrap around side frames
- Installing the swing bearing onto the car body
- Ensuring all connections are properly torqued
Step 4 – Assembling the Mainframe & Counterweight
Next is the assembly of the mainframe, which will usually happen at the same time or just before installing the undercarriage. Here you’ll be:
- Installing the mainframe onto the car body
- Connecting all the hydraulic hoses and pipes
- Installing the side modules (which contain the engines, pump drives, pumps and more)
- Adding the counterweight to the mainframe
- Installing the operator cab to the mainframe
Step 5 – Attaching the Boom, Arm & Bucket
Now, we’ve almost got all the main components together, with just the boom, arm, and bucket to be installed. Once you have, you’ll need to focus on:
- Connecting the remaining pipes, hoses, and hydraulic cylinders
- Ensuring all pins and covers are installed in line with Hitachi’s instructions
- Installing the bucket, ensuring all teeth, cutting edges & extra wear components are attached
Step 6 – Local Options Install
The last step of assembly is to install all customer and regional specific options that set the EX8000 up for successful operation considering local conditions. Local options installed may include, but are not necessarily limited to:
- Cold weather packages (with heaters for machine fluids to support easier start-up in winter months)
- Fire suppression systems
- Radios, communication systems, and mine dispatch systems
- Additional lighting
- Customer logo and/or unit number signs
- Extra emergency disconnect switches
Step 7 – Final Checks & Adjustments
Now that the EX8000 is fully assembled, it’s time to ensure that everything works as it should. Final inspection & testing involves:
- Fluid level checks and top ups
- Checking that no loose/missing connections exist
- Carrying out a functional test of all systems e.g. engine, electrical & hydraulics
- Consulting the operator’s manual for correct break-in & maintenance procedures
- Production study to prove machine capabilities (tons per hour)
Here to Help You Enjoy the Benefits of the Hitachi EX8000
As we can see, the Hitachi EX8000 is an extremely powerful excavator that requires time and expertise to assemble properly. Remember, this guide is just an overview, meaning that there are countless fine details that are not covered here. We always recommend referring to Hitachi’s official manual and your Hitachi mining equipment experts at Wajax when assembling these rigs.
Wajax is not only the exclusive distributor of Hitachi Mining Equipment across Canada, but also experts in installation, repairs, and maintenance – meaning we’ve got you covered!
To find out more about this giant mining excavator, get in touch with the Wajax experts today. With a deep understanding of all of Hitachi’s leading Mining & Construction Equipment, we’ve got the know-how to get you set up and enjoying the EX8000’s benefits before you know it.